Web basics for Digital Marketing
8+ Minute Read
Web basics for Digital Marketing
The Web basics for Digital Marketing will be discussed in this chapter.
Being digital marketers, we are expected to have strong web basics for digital marketing.
When I say Web basics for Digital Marketing I mean to say you should know what is Internet. what is www? what is HTTPS? what is a domain name? what is hosting space and details like these?
What is Internet? – Web basics for Digital Marketing
The Internet is the global system of interconnected computer networks that use the Internet protocol suite (TCP/IP) to link devices worldwide.
What is a HTTP? – Web basics for Digital Marketing
The Hypertext Transfer Protocol (HTTP) is the method used to transfer Web pages to your computer.
What is a Web Browser?
A web browser is a software application for retrieving, presenting, and traversing information resources on the World Wide Web.
URL: The address of a World Wide Web page. (Uniform Resource Locator)
HTTP: Hypertext Transfer Protocol – Method/protocol used to transfer web pages to your computer
Hyperlink (Link): A hyperlink points to a whole document or a specific element within a document.
Hypertext (anchor text): Text with hyperlinks.
Webpage: A HTML/Hypertext document connected to the World Wide Web.
A web page is a document that is suitable for the World Wide Web and web browsers.
Website: A collection of related web pages is called a website.
Domain names & Domain extensions
A domain name is your website name
A domain name is an address where Internet users can access your website Computers Generally use IP addresses, which are a series of numbers.
But it is difficult for humans to remember strings of numbers.
Because of this, domain names were developed and used to identify websites on the Internet rather than using IP addresses.
A domain name can be any combination of letters and numbers, and it can be used in combination with various domain name extensions.
Domain Extension:
The definition of a domain extension is the notation at the end of a web address that specifies an Internet category or a country code.
Internet category Examples:
- .com for commercial
- .org for organization
- .gov for the government ( Not for Sale)
- .edu for all educational institutions
- .net for a network.
Country Code Examples:
- .us – USA
- .uk – UK
- .de – Germany
- .in – India
Web Basics: Domain Name Registration (Backend Process)
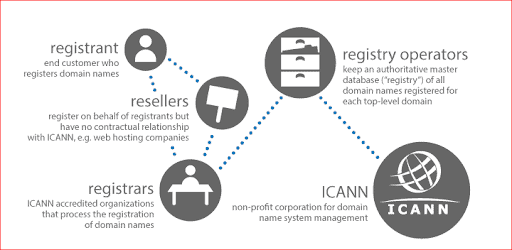
- End customer – Registrant
- Resellers
- Registrars
- Registry Operators
- ICANN
User side Steps:
- Decide on the Name and extension.Se
- arch for availability
- Pay and register.
- Target your keyword / Brand Name
- Make it Relevant
- Keep it short
- Target Location
- Industry-specific
How to choose domain name?
- Decide on the Name and extension.
- Search for availability
- Pay and register.
Types of Web Hosting Services:
- Shared Hosting
- Dedicated Hosting
- Cloud Hosting
Web Basics: Web Hosting
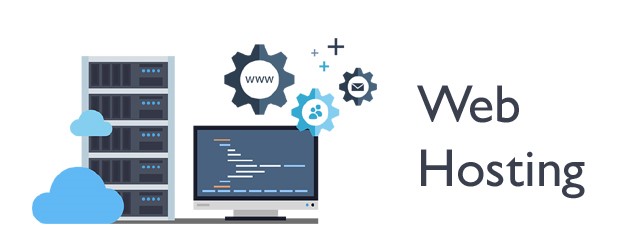
Web hosting is buying/having space on the internet where you store your website and serve it to users from there.
When Internet users want to view your website, all they need to do is type your website address/domain into their browser.
Their computer will then connect to your server and your web pages will be delivered to them through the browser.
A web hosting service provider is a business that provides the technologies and services needed for the website to be viewed on the Internet.
You can buy a domain name and web hosting space from different providers.
Types of Web Hosting Services:
- Shared Hosting
- Dedicated Hosting
- Cloud Hosting
Shared Hosting:
In a shared hosting environment, your and other website owners share one server.
Shared hosting services are affordable because the cost to operate the server is shared between you and these other owners. But will be slower and can’t handle high traffic.
Dedicated Hosting:
You have the entire web server to yourself.
This allows for faster performance, as you have all the server’s resources entirely. But relatively Higher in Price.
Cloud Hosting:
Cloud hosting is renting out resources from a cloud computing provider to host data, services, or solutions.
Cloud hosting is considered a better option than shared hosting because of its ability to handle large amounts of traffic.
Cloud hosting has better security protection than shared and is more reliable. But Cloud hosting is more costly than shared hosting plans.
Buy cloud hosting for WordPress websites at a cheap price.
What to consider while choosing a hosting?
- Speed
- Support
- SSL
- Cost Effective
- Multiple Websites
- unmetered Traffic
Which of the 3, Shared, Dedicated, Cloud hosting is preferred? : Web Basics
I would suggest you go for a cloud hosting provider though it is a little expensive because the speed and performance of cloud hosting are far better than shared hosting.
Rocket Speed: Cloud ways is the fastest WordPress hosting solution with a load speed of 79ms and a performance grade of 96 without any optimizations.
Unlimited Applications: You can use one single hosting for any number of websites.
Free SSL (unlimited domains): Cloud ways Provides free SSL certificates for all the websites hosted.
No Commitment: Unlike other hustings, you need not pay for 12 months or more, you can pay on monthly basis and cancel the plan whenever you want.
Free Migration: Helps you migrate your WordPress website for free.
Cheaper solution: Let you use the service for just 10$ a month which is the cheapest among other cloud providers.
3 Days free trial: You can use the free trial for 3 days and then decide whether to buy or not.
Coupon Code: For the first 2 months you can get 20% OFF by using this coupon code: BROLLY20Click on the link below and use coupon BROLLY20 to avail of this discount.http://bit.ly/cloudways20off
Web Development – Web basics for Digital Marketing
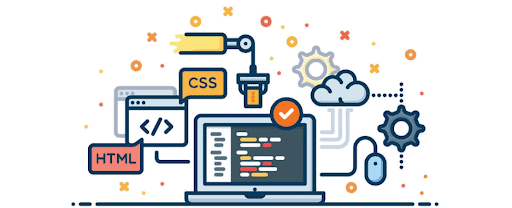
The Work involved in creating a web page or a website is called web development.
The process of creating websites or web pages is called web development
Types of Websites:
- Static websites.
- Dynamic websites.
Static Websites:
The websites in which the content is static or doesn’t change until it is changed.
No database operations are required.
No Complex coding is required.
Requires only frontend coding
Easy to create and maintain
Dynamic Websites:
- The websites in which the content is dynamic or changes, according to the user’s actions/interaction and Behavior.
- Need database operations.
- coding is relatively complex.
- Not so easy to create and maintain when compared to static websites.
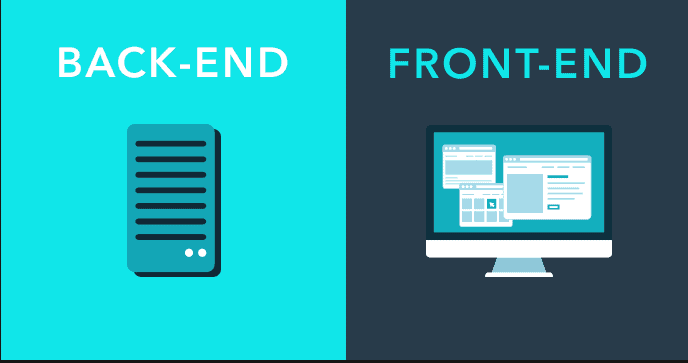
- Requires full stack coding skills – Front End, back End, DB queries.
Front End Coding:
The coding is done just for displaying the content. Just needed a browser to run the code
HTML, CSS, JavaScript, and Bootstrap (Framework) are examples.
Back End Coding:
The coding is done on the server side. To store, edit, and retrieve data in the Database and perform calculations or other actions.
Needed a server to run the code, Apache, and Tomcat is examples.
Java, .net, and PHP are examples.
WordPress website development basics for Digital Marketing
WordPress is a content management system (CMS) that helps us to create and manage our blogs/websites without having to do much of doing.
What is CMS?
Content management system is an application/system that allows us to manage our website content such as text, images, and documents, without having to edit the code of the website/blog.
Why WordPress?
- You can create a dynamic content without coding knowledge.
- Even most of the styling can be done from themes/theme options without writing CSS code.
- Plugins helps in add functionality to the website.
- Websites built on WordPress are easier to optimize for the search engines.
- Predefined user roles help us to set different levels of permissions to users.
WordPress Installation:
2nd step – In the download portal, you can find various platforms to download it. So to use it on your computer choose the Win/Mac/Linux option which will access you the download option. You have to choose your OS there and just click on the download option.
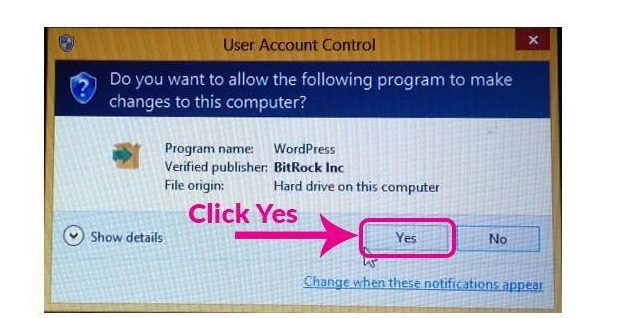
3rd step – When your installer file is ready just double click on it which will show you a User “Account Control Option” and here you have to click on the yes button.
4th step– choose your desired language & click the OK button. After the language option, you will move to the welcome page of the setup wizard where you have to click on the next button. It will take u to the select component option where you have to click on the NEXT button only.
5th step– Clicking NEXT on the Select Component option will take you to the Installation folder where you have to choose the destination folder or you can simply click on the NEXT button.

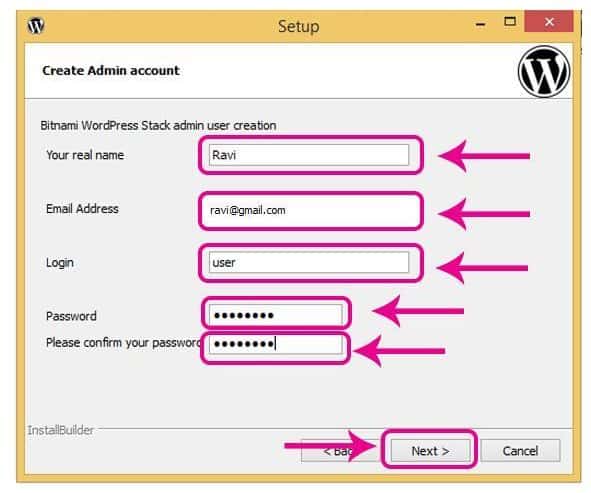
6th step– In the next step, you will be on the create admin account option. This step is most important in your installation process where you have to create the admin account. Give your Name, E-mail id, User-name, and Password, and click on the next option. Just note down your user login & password details for future use. After this click on the NEXT button.
7th step– After the previous step it will show you the Blog Title option of your WordPress website. You have to give a specific name of your own. After clicking on the NEXT button.
8th step– After putting a name to your blog next step is Configure SMTP Setup where you don’t need to do anything. Just click on the NEXT button.

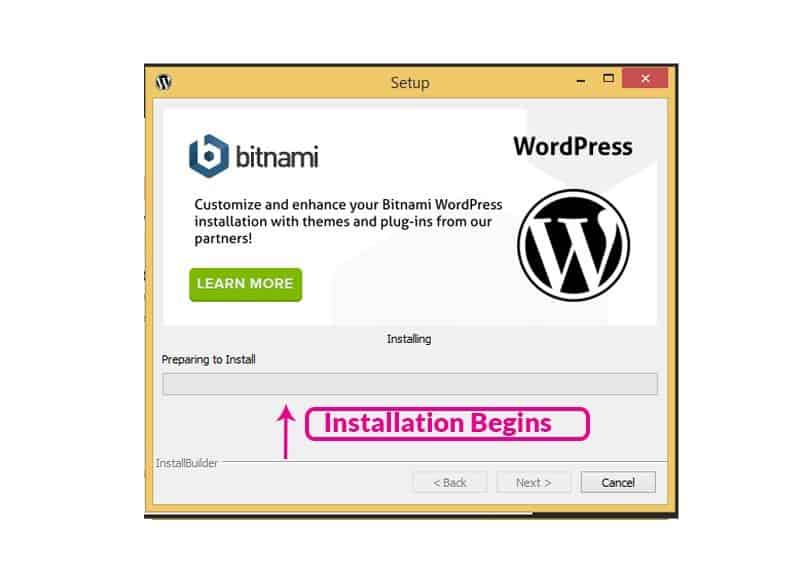
9th step-In this step you have to tick out the cloud lunch of WordPress and click on NEXT. Now the WordPress installation will begin after clicking on the NEXT button and may take a few minutes to complete.
10th step– In this step, your installation will be complete within a few minutes after that you have to click the NEXT button, which will launch the WordPress
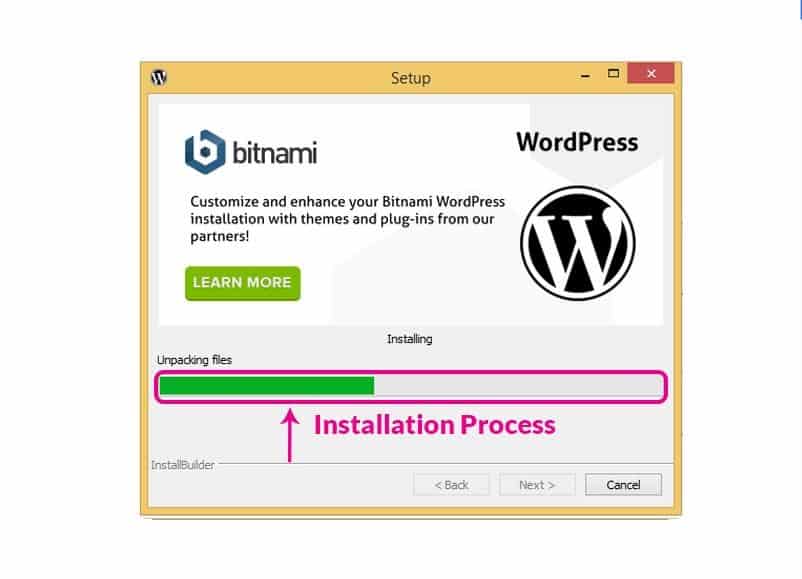
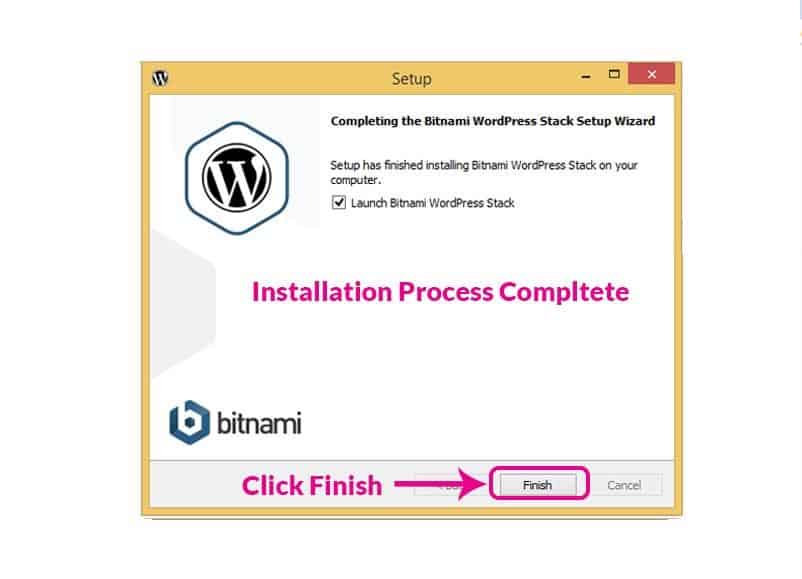
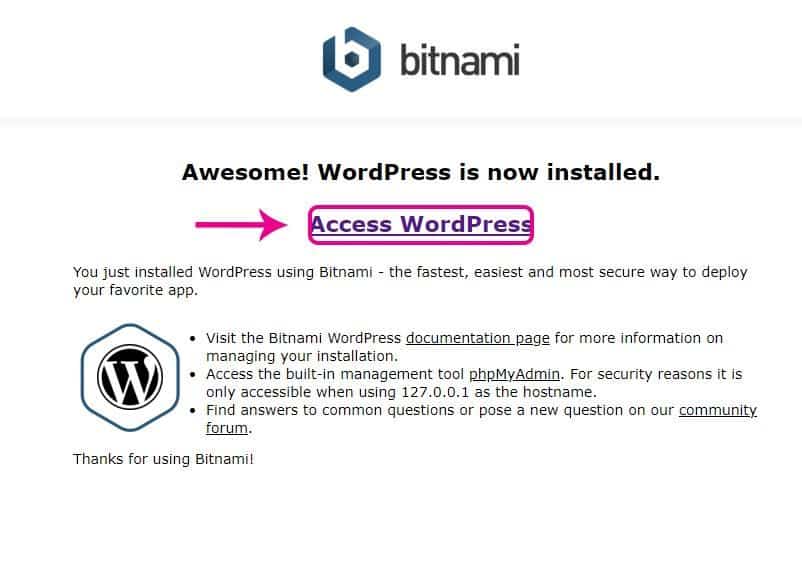
11th step– Now your WordPress is all set and You have to click on the Access WordPress to open it. Now it will open in your browser.
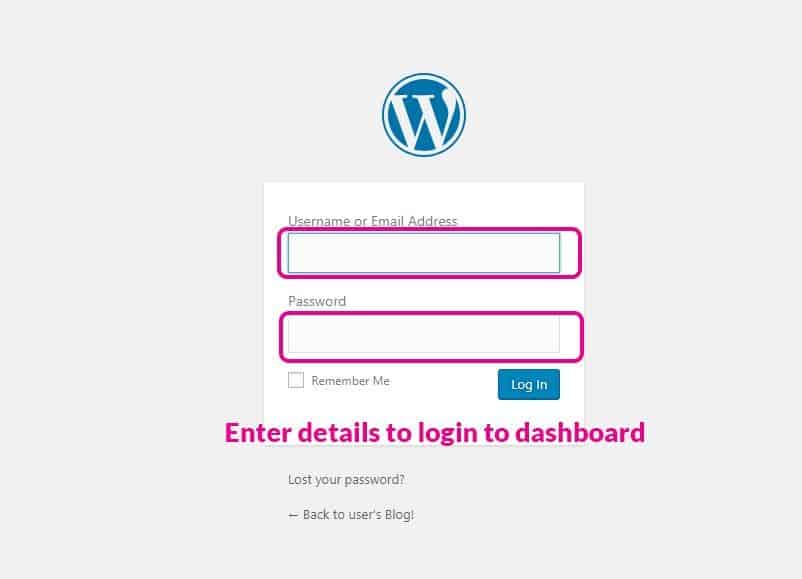
12th step– In this step, it will ask you to log in with your User Id and Password. You have to log in with the same User-id and Password which is already set in step 6th. After login in, it will show you the WordPress dashboard which you can customize according to your requirement.
Learn WordPress Training from industry experts.
WordPress Dashboard
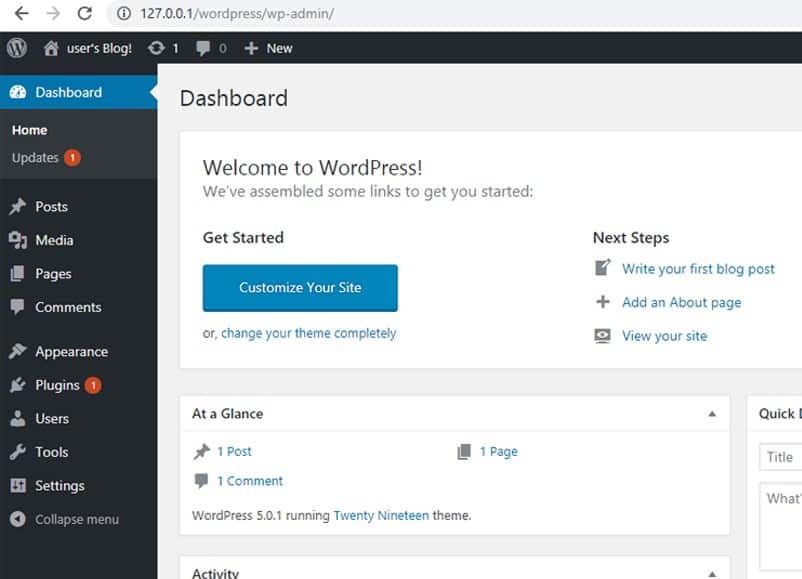
WordPress dashboard is the very first screen when your log in to the administration site of your blog which will display the overview of your website. In the dashboard, you will find the details customization button of your WordPress website. You can create posts & pages, add media, etc. from your dashboard menu to your websites. You can also add menus, widgets, plugins, etc. from the dashboard menu.
Installing and customizing Themes.
In WordPress, You can choose thousands of themes to design your website. To install themes-
1. Click on the Appearance on the dashboard menu and next click on the Themes. You can find some themes there which can be used on your websites. Just click on the themes and the activate button is there to install it.
2. If you want to add different themes just click on the Add New button and thousands of new themes are available for use. You can also search for different themes there.
3. If you have your theme you can also upload it to the WordPress websites.
After your thing is installed you can customize it according to your requirement. You can choose a different color, header images, and background images by customizing your themes. You can also create a menu from customize option.
Creating Categories, Pages and Posts
On the category page of your WordPress websites, you can list all the posts in your blog from a particular category. By Creating a category, you can give your reader to browse through the contents of that particular category in one place easily.
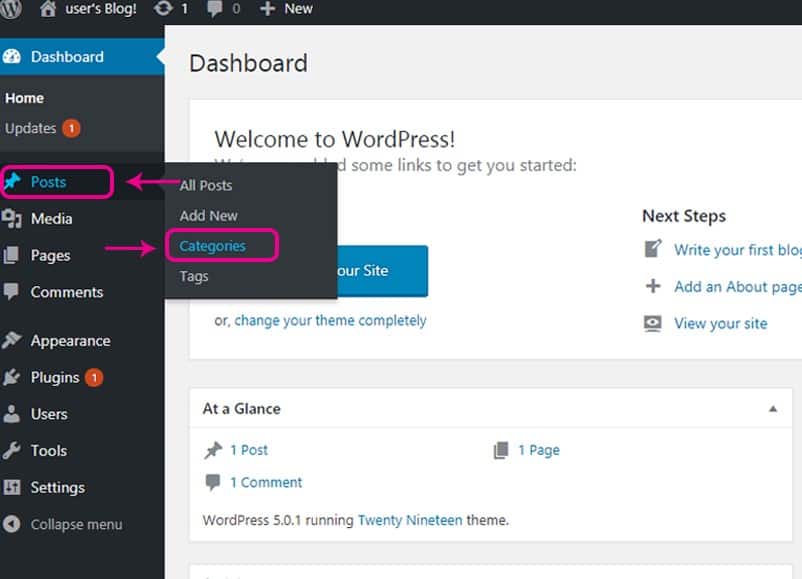
1. To create a category, click on Post and you can find the Add new category option there.
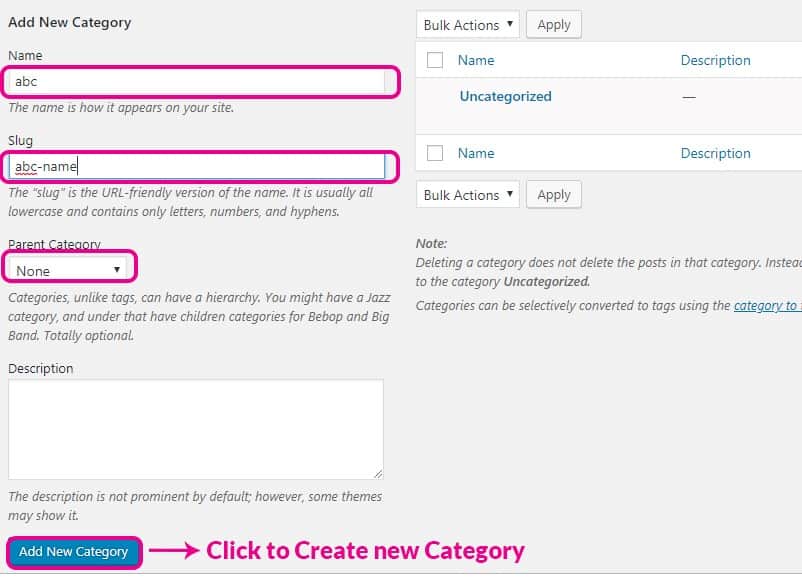
2. Give your category name, choose your parent category, give some description about it and click on Add New Category. Now your category is ready. In WordPress, you can add your actual content to pages.
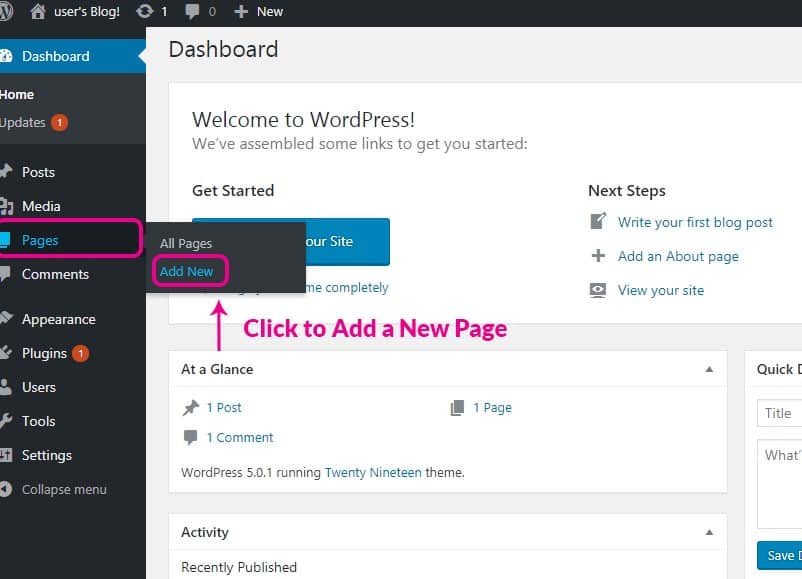
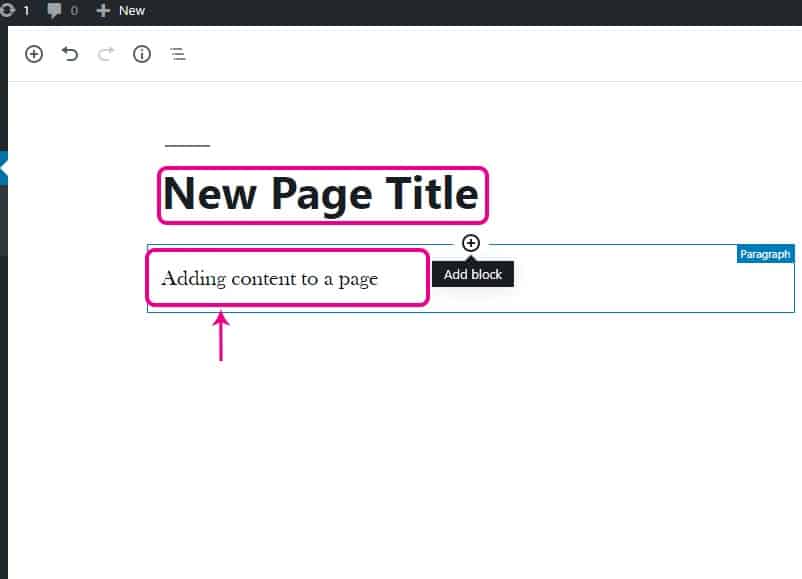
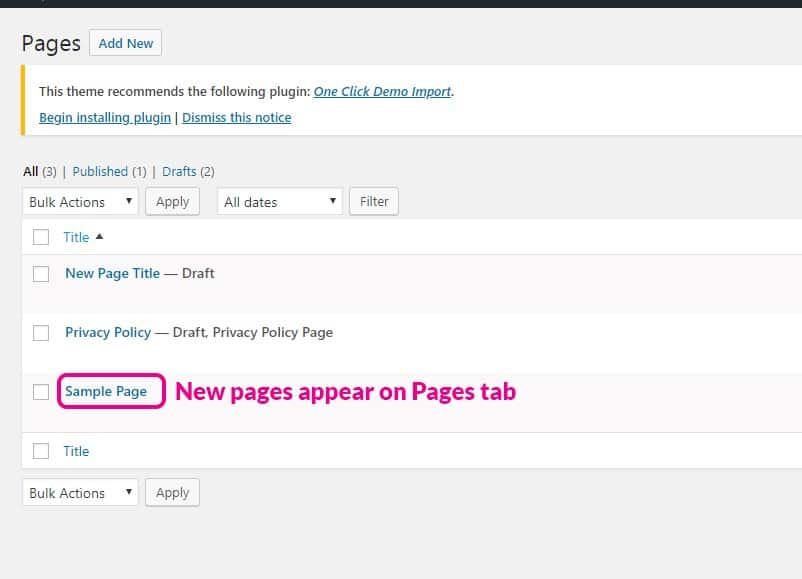
3. To add a new page, click on the page and then click on Add New button.
4. Now give a name to your page and add content there.
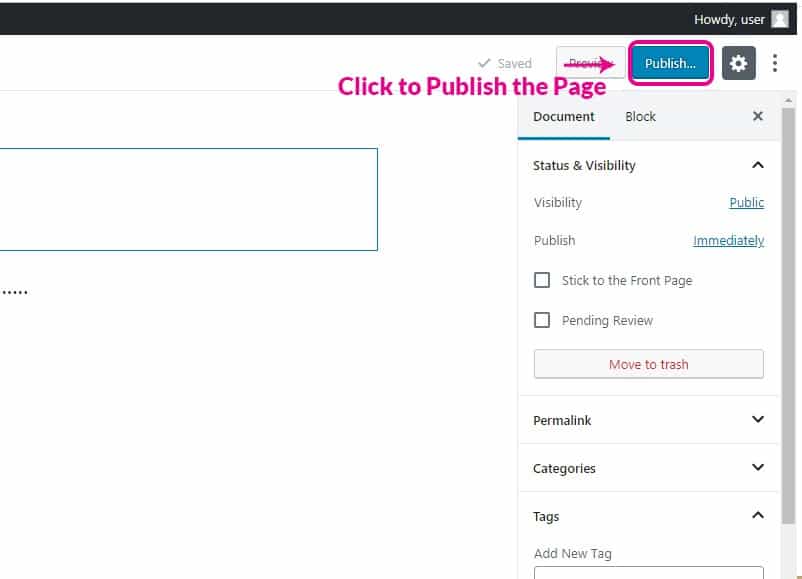
5. After your content part is done, click on Publish button which will be in your right-hand area.
6. After your content part is done, click on Publish button which will be in your right-hand area.
In posts, you can also add content like general discussion or news on certain topics. Posts are always listed in reverse chronological order and will show the published date and time
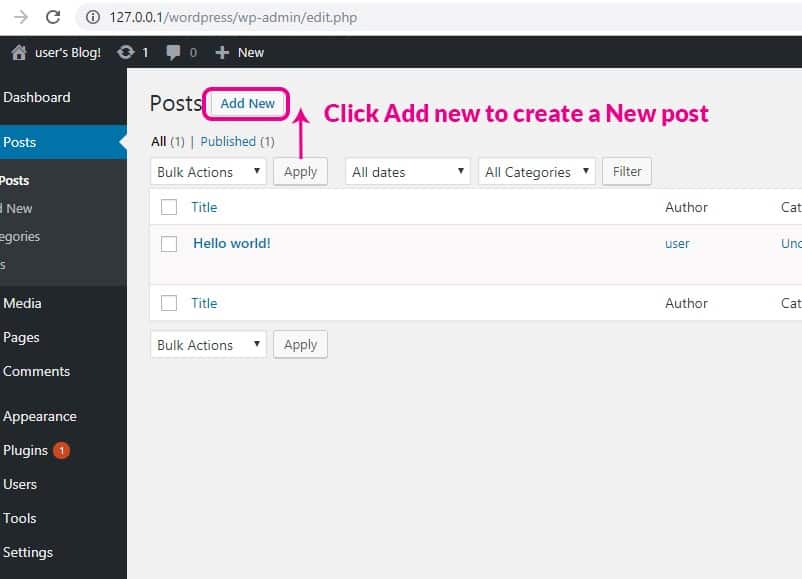
1. To create a new post click on Post and then click on Add New button.
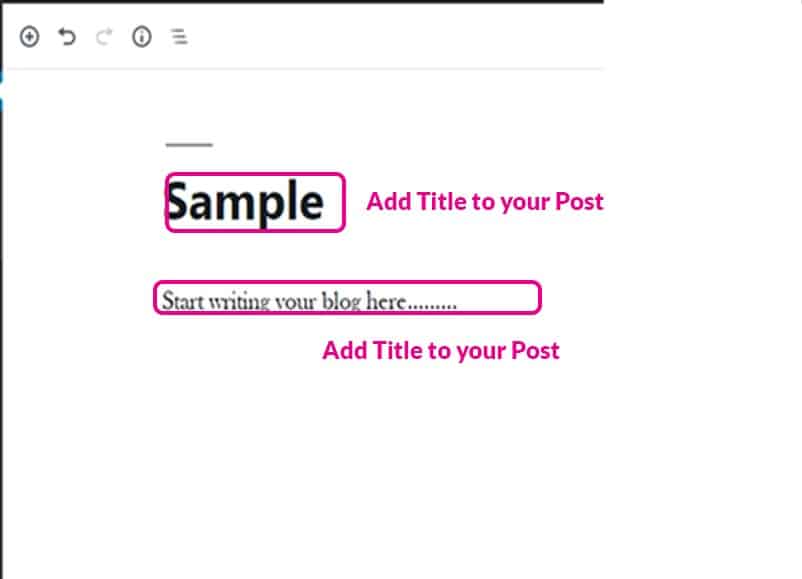
2. Now enter your Post Title and add your Post content.
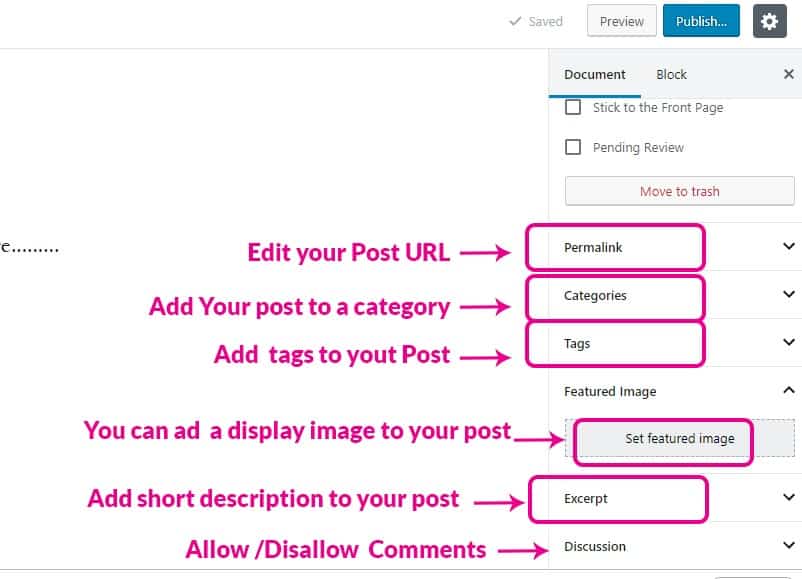
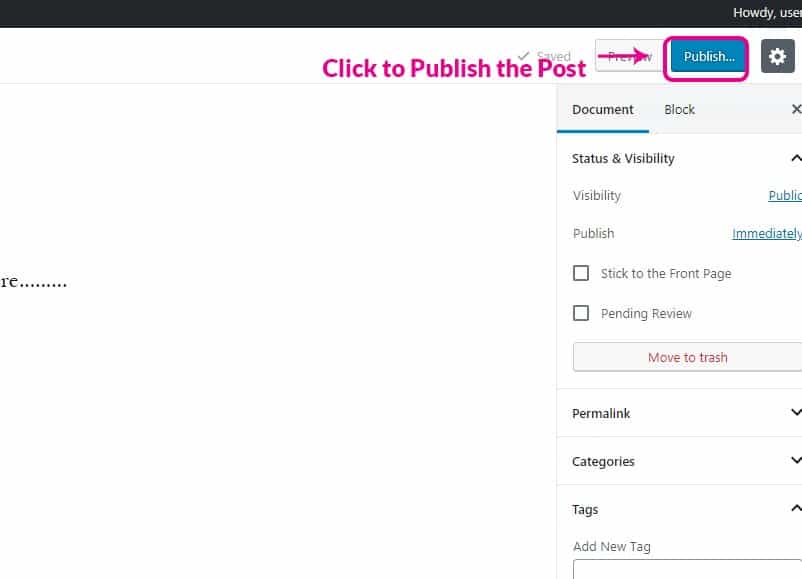
3. When your post is ready you can customize the post setting where you can add it to a definite category, can set your featured image, can allow or disallow comments, etc.
4. After completing all your customization click on the Publish button.
Creating Categories, Pages and Posts
The menu is very important for any website which helps the customer/viewer to go through the website without any problem. The menu organizes the website’s content in an organized way and users can find any content from it.
So to create a menu on WordPress websites
1. Go to the appearance on your dashboard and in appearance, you can find the menu button.
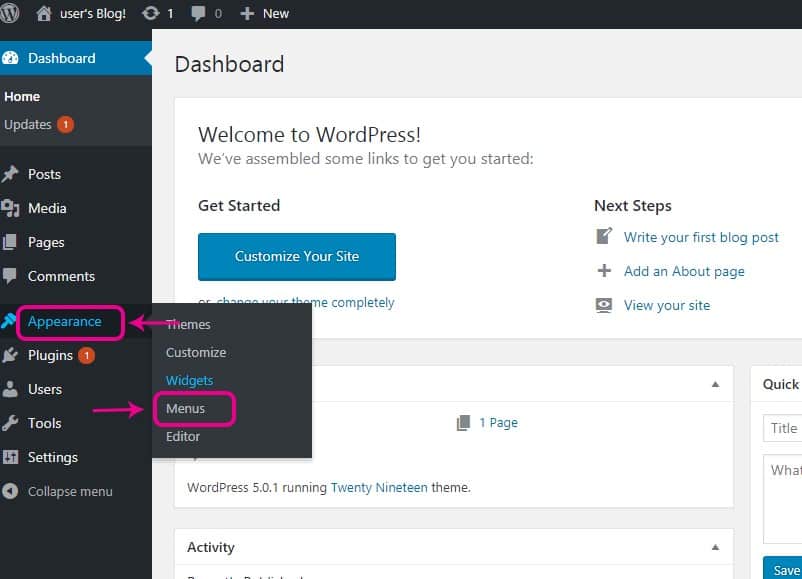
2. Now click on it and give a name to your menu.
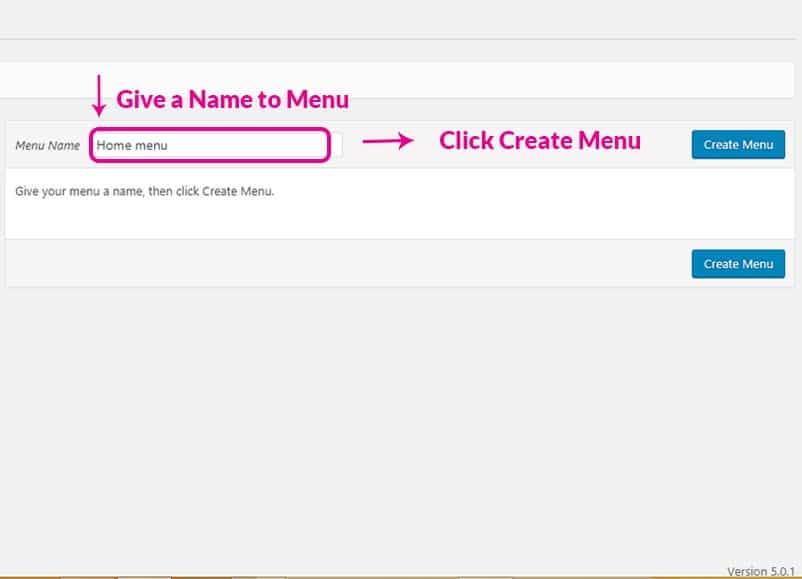
3. After creating it you can start adding pages to it. You can add your pages and post to the menu.
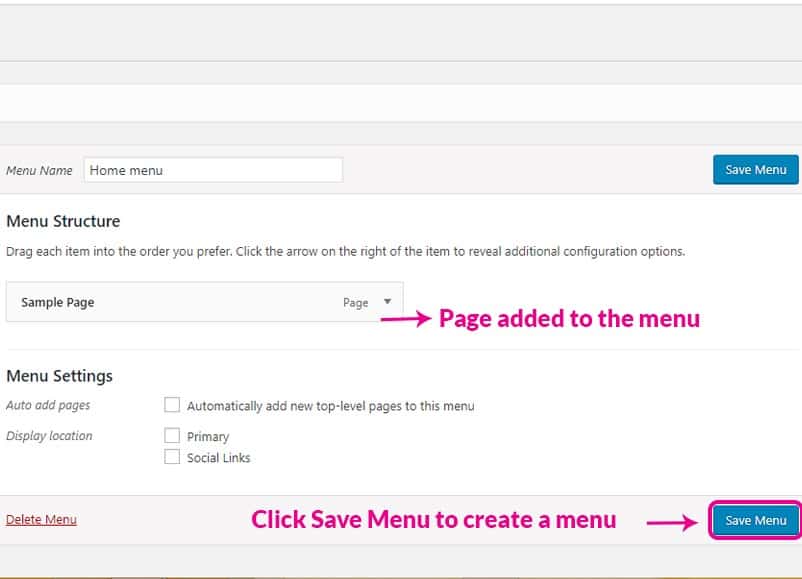
4. To add your pages, posts, or category in the menu click on the pages and then click on View All option and select your post or pages which you want to add to the menu.
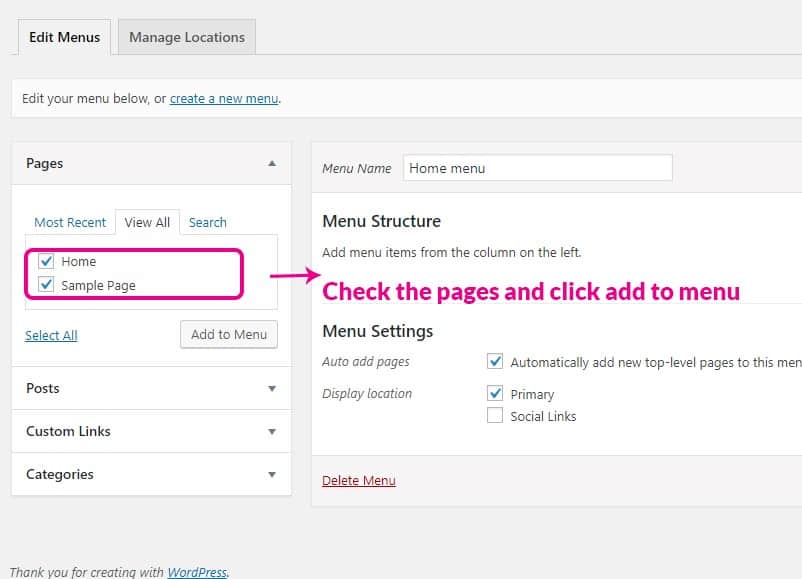
5. After adding your pages/post click on the Save Menu button.
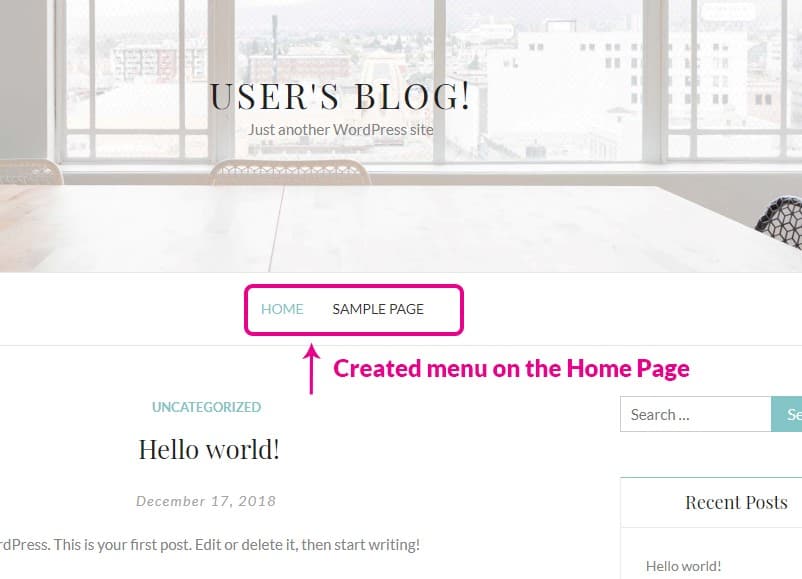
6. Once you save your menu now refresh your frontend and your menu will be shown there.
Adding Widgets
WordPress boxes are nothing but small boxes that perform some special function on your websites. Widgets are mainly created for providing an easy way to use the design of your websites. It also controls the structure of your WordPress theme. Widgets can be simply dragged and dropped to specific areas.
By default, WordPress comes with many preloaded themes like Calendar search, Recent menus, Audio, Images, categories, etc. By adding plugins and themes you can add new themes other than the preloaded themes
To add Widgets to your WordPress themes
1. Go to appearance and click on Widgets.
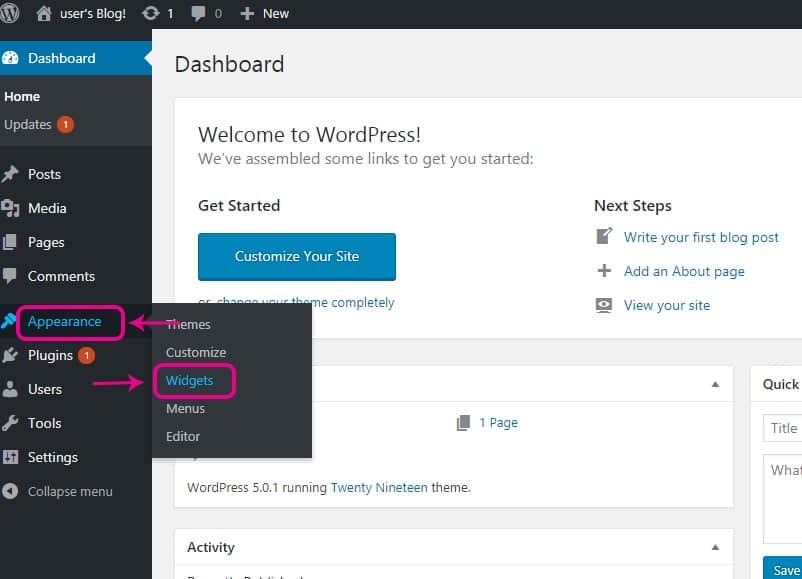
2. Choose from the available widgets which are preloaded with your theme.
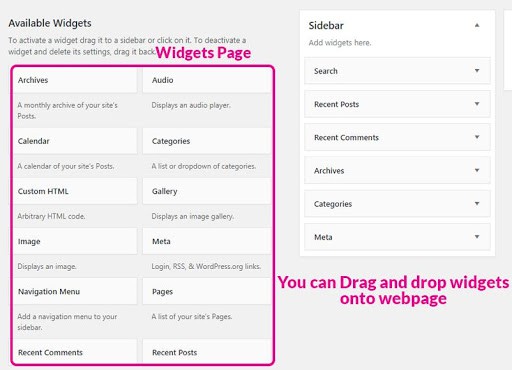
3. You can also add a widget by just dragging it to the widgets area or clicking on the widgets and selecting where to add it.
Your widgets are mainly depending on your themes. Your theme should have the add widget option otherwise you can add new widgets there. So you have to choose themes carefully.
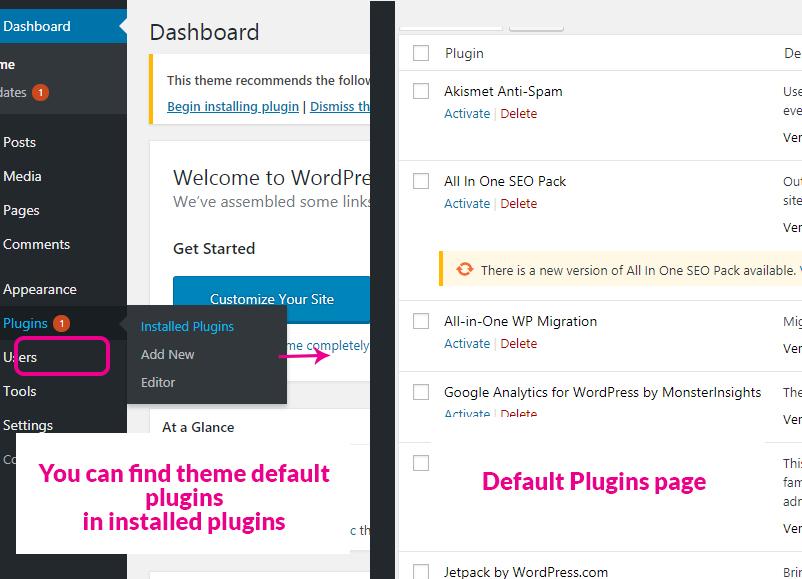
Install Plugins
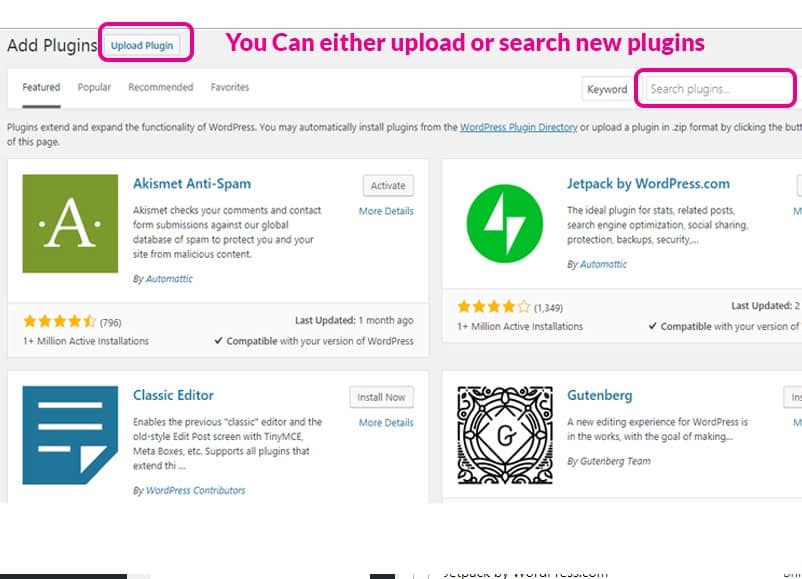
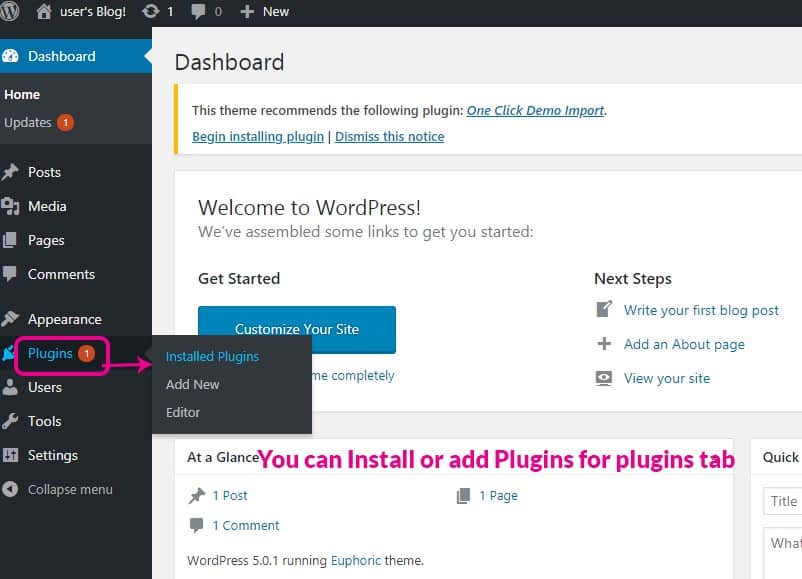
The plugin is a piece of software that contains some functions and can be added to WordPress websites. Plugins usually add some new features to your websites. To install plugins to your WordPress websites-
1. Go to the plugins in your dashboard and click on plugins.
2. You will find the default plugins available with your WordPress theme.
3. To add plugins, you can upload your plugins or you can search for new plugins there in the Search plugins area.
